Tuesday, January 25, 2011

Pantry Overhaul

Yahoo!!!!
Our pantry is finally done.  It all started last summer when I found Shelley from houseofsmiths.blogspot.com.   She posted her pantry makeover.  I fell in love with her blog.  She is very talented.  I love her ideas, style, pretty much everything she does!

Here is my finished pantry :).  It took so long because I started, stopped, filled it up with Christmas presents, then finally finished it.
Grab a treat - picture overload!
*Keep in mind that this along with my freezer, and a cabinent corner turntable is all the storage I've got for food!  This is has been a project for me.  I've tried to keep it simple yet organized while not spending much.  Here we go...
Sorry, this is the only before pic I could find.

This is how I stay organized.  I made this from a piece of metal, added the lines from small black tape found at an office supply store.  I laminated the calendar pieces (from a scrapbook kit that I bought a few years ago), then added magnents, and, finally, used a few organizing holders from the Dollar Store.
 Shelley painted her walls and added vinyl.  So Cute! 
I went the easy route and used Con-Tact paper that I already had.
 Easy to apply and can be wiped off if something gets spilled on it.
 Cut off the excess.
Left side.
Right side.
Food Storage: 5 gal. buckets with gamma lids (a must).
Water storage.
I hate having the griddle and the art supplies in the pantry, but it has to go somewhere!
We broke down and bought a 3 month supply of dailybread.  It is actualy really tasty.
And I HATE having these extra things here but, again, it has to go somewhere.
This new plug is my 2nd FAVORITE part of the pantry.  My brother-in-law put this in just a few weeks ago for my wheat grinder.  I love it!
This is my FAVORITE part: the treat section. The target bag is full of Halloween candy!
Baking goods, and goos (for biking/running).
 I really tried to do like Shelley and use baskets or boxes to keep thing organinzed.
Paper storage, cleaning products, and extra items like stud finder, bag of batteries, a picker-upper, lights etc., in the basket.  One day I will get around to panting the added shelf.
I hope you enjoyed my pantry tour!

Monday, January 24, 2011

Best Camis EVER!

I found the BEST camis Ever.  Only $2.50 you can buy one in every color!  http://www.forever21.com/.  They are perfect for layering and they stay in place (no crawling up).
Happy Monday!

Friday, January 21, 2011

Say Good Bye To Your Mop!

Say hello to the Bissell Steam Mop Deluxe (my new BFF). 
The best part is no bucket, chemical free, and you throw the cleaning pad in the wash.  So easy to use and it saves me so much time.  

Wednesday, January 19, 2011

M's Room

Here is M's room before we turned it into a play room (pics of that soon).
Her Bed! Sheet found at Target. Ruffel found at Pottery Barn. 
I sewed a ribbon to her bed ruffle.  It needed a little pink!
I wish I would have taken a before pic of her dresser/changing table when I first bought it.  It was dark purple and one drawer was broken. Other than that it is in awesome shape.  I found it for 20 bucks!  I painted it pink then distressed it with brown glaze, added new knobs, and covered a piece of wood to fit in the broken drawer spot to be used as a shelf.
Knobs found at Hobby Lobby.  They have a GREAT selection of knobs.
Window coverings found at Downeast.  It needed something more so I headed back to Downeast and found sheer curtains.
I had a small rod so I used wire and attached it to the existing rod for a double rod like this.  Now I can open up the green curtain and have the sheer curtain stay in place.
A friend of mine made a mobile for a shower gift and I had to make one for M.  She loved it.  She loved to blow and make it move.  So cute.  I couldn't find matching paper or anything similar to her bedding so I took her sheet up to the local print shop and color copied it to make matching paper!  I also covered her wet wipe case with the same paper.  You can also shrink the size or blow it up for different looks.
Thanks Jen for helping me paint the matching tree.  I love it!
Chair found at RC Willey's.

Tuesday, January 18, 2011

Under-Skirt Tutorial

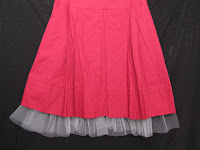
Step 1: Start out with a slip.  I chose a white slip that was 16 in. long.  I am 5'3"  and this hit right above my knees.  Choose the length is best for you!  You might want to measure the lengths of your skirts so the slip is long enough but doesn't show.  Do the same if you are making this for little girls.
Step 2: Buy the same color of tulle as your slip.  I bought 2 yards of tulle so I didn't have to piece it together.  If you want to piece it together just over lap it a little.  Don't sew along the small edges of the tulle because you will see it. 
Cut the tulle into a piece 6 1/2 in. X 2 yards.
Step 3: Now change the setting on your machine to the widest stitch available.  Mine is a 6.0.  Sew along the edge of the tulle.  Make sure you do NOT back stitch.
Step 4:  Pull ONE of the threads and it will bunch up like this!
Step 5:  Pin it to the bottom of your slip.  You can make it as full as you want.
Step 6: Sew it together.  Make sure you have changed your settings back to a normal stitch!
Step 7 (optional):  Sew it again a little closer to the edge.
This is the other side!
Finished project!
Before                                                                 After

Try one in black too!
Happy Twirling!

Monday, January 17, 2011

Good Old Dollar Store!

The Mr. just celebrated his 40th Birthday!!!  We (the girls and I) wanted to do something fun for his birthday, the big 4-0!  We found 40 gifts to give him for 40 days leading up to his birthday (one gift each day).  We had a blast finding funny and great gifts that he loved.  We also did a few homemade coupons.  One of our favorite gifts was Pin The Tail On The Donkey!  This game was awesome.  It came with a poster, mask, and 12 stickers (so we played it three times).  We had a blast.  It was by far the best Dollar Store find of the year!

Friday, January 14, 2011

What's For Dinner?

Can't decide what to eat for dinner?  Sick of the same old?  I found thefoodnanny.com at Swiss Days this summer.  I purchased her book and was a little skeptical.  I LOVE IT so much. Check out her website, it is awesome.  Go to nanny plan beta...there you can choose what to eat for 2 weeks.  Then print it out and if you want you can print our your grocery list too (of course you need her cookbook-I would recommend buying it for sure). 

*I like to incorporate my recipes too so I printed out a blank one and laminated it.  I use a wet-erase marker to write on my 2week menu. 

Thursday, January 13, 2011

E-6000

This is my FAVORITE glue ever.  It has an amazing hold.  It can hold everything: fabric, wood, metal, glass ect. This is a must to always have on hand.